Printers are located in the departmental mailrooms RW 422 and ESC 3045, and Stewart 305 for HMB. RW has one monochrome and one colour printer. ESC has two monochrome printers. The printers also copy, scan to email, staple, hole-punch, and can handle large document preparation jobs. If you need to print in colour in ESC, please contact EEB Reception.
In order to print you need a valid User Code. If you do not have a User Code, please contact CSB Reception (for the Ramsay Wright printers) or EEB Reception (for the Earth Sciences printers). If you send a print job without the User Code, the printer will discard it with no error or warning. The code is also used to access printer functions like copying and scan-to-email.
Instructions below are for those who wish to configure their computers themselves. If you need assistance setting up printing on your computer, please contact BIOTA. If you notice a problem with any of the printers — paper jam, empty supplies, or mystical error messages, please inform Reception in the appropriate building.
Printers & Drivers
Download and install the appropriate driver for your operating system and chosen printer.
Windows driver for all Ricoh printers (universal, x64, 2022-03-10):
https://support.ricoh.com/bb/pub_e/dr_ut_e/0001329/0001329383/V41200/r96401L1a.exe
macOS driver for ESC esc3045-ricoh-door/wall.eeb (IM 8000, 2020-11-25):
https://support.ricoh.com/bb/pub_e/dr_ut_e/0001322/0001322536/V1000/Ricoh_IM_7000_8000_LIO_1.0.0.0.dmg
macOS driver for RW rw422-ricoh.csb
https://support.ricoh.com/bb/pub_e/dr_ut_e/0001316/0001316528/V3800/Ricoh_PS_Printers_Vol1_EXP_LIO_3.8.0.0.dmg
macOS driver for RW rw422-ricoh2.csb (C5503, 2020-02-17):
https://support.ricoh.com/bb/pub_e/dr_ut_e/0001316/0001316460/V3900/Ricoh_PS_Printers_Vol3_EXP_LIO_3.9.0.0.dmg
Instructions for Windows and macOS follow. It is also possible to print from some other operating systems such as Linux. Please contact BIOTA for assistance.
| Printer Address | Description |
|---|---|
rw422-ricoh.csb.utoronto.ca |
RW mono |
rw422-ricoh2.csb.utoronto.ca |
RW Colour |
esc3045-ricoh-door.eeb.utoronto.ca |
ESC mono |
esc3045-ricoh-wall.eeb.utoronto.ca |
ESC mono |
ricoh.hmb.utoronto.ca |
Stewart building |
Windows Instructions
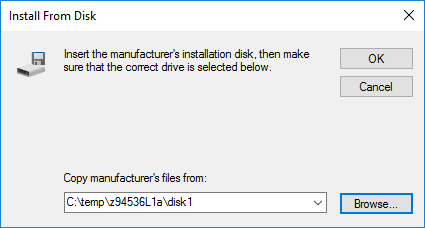
First, download and extract the Windows driver above. The necessary files will be extracted to: C:\temp\z94536L1a\disk1
You will need to point the printer installer wizard at this location to find the correct driver.
Open Windows Settings / Devices and click Add a printer or scanner
A list of network printers will populate; DO NOT select a printer from the list. Instead, scroll to the bottom of the list and click The printer that I want isn’t listed.
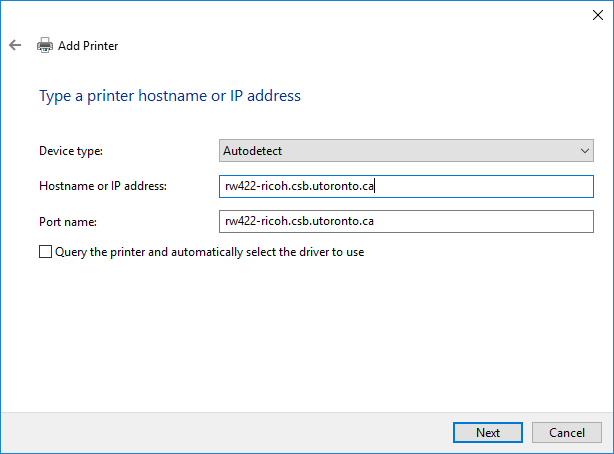
In the dialog box, select Add a printer using a TCP/IP address or hostname and click Next. Paste the hostname for the printer you wish to install as shown. UNCHECK Query the printer and automatically select the driver to use. Click Next.
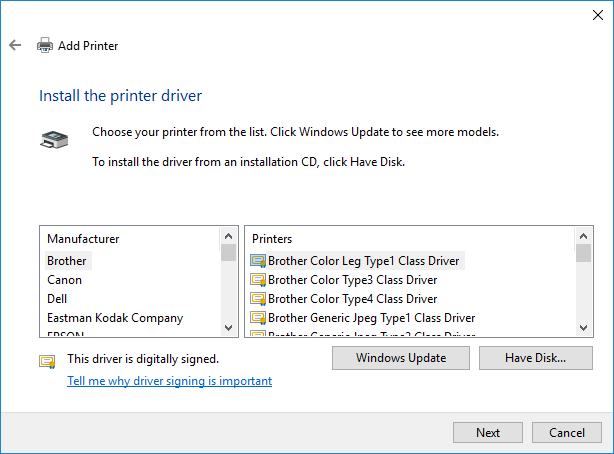
Click Have Disk…
Browse to or paste the following path to the printer driver files and click OK.C:\temp\z94536L1a\disk1
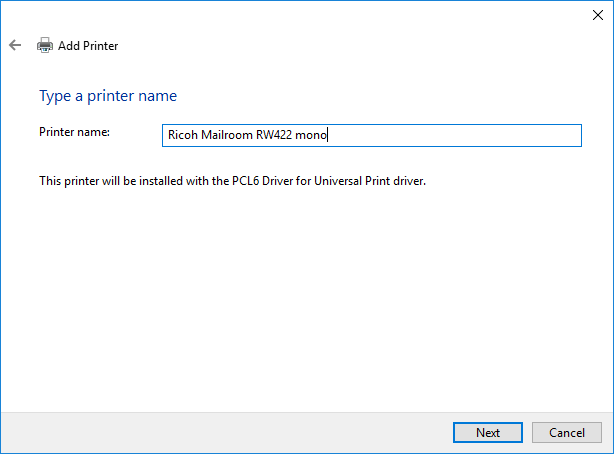
On the next screen select PCL6 Driver for Universal Print and click Next. Give the printer a useful name — this is what the printer will be called throughout Windows, so make it clear. Click Next.
Finally, select Do not share this printer and Finish. The printer is installed.
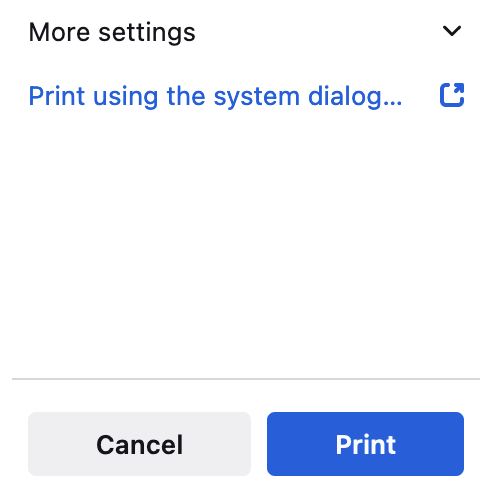
Open any document that you wish to print. If the dialog box looks different than the image below, the application is presenting a custom print dialog that will cause problems with printing. Chrome, Acrobat, and other popular programs do this. In this case, you need to click More Settings… / Print using system dialog.
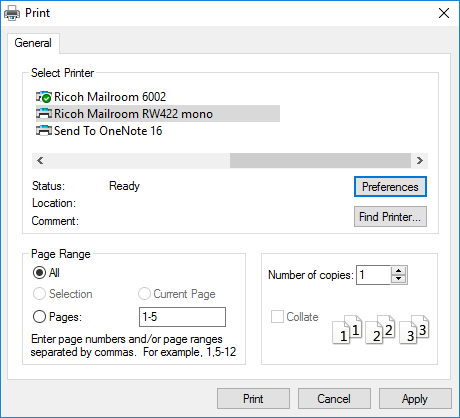
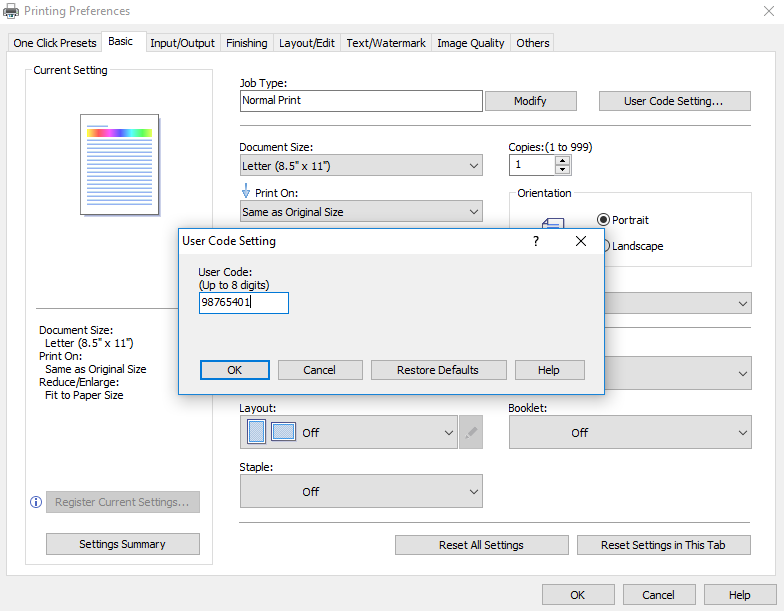
From the system print dialog, select the printer you wish to use, and click Preferences. In the box that pops up, click User Code Setting, and enter your User Code. Click OK twice and you are ready to send your job to the printer.
macOS Instructions
Go to System Preferences / Printers & Scanners.
Click + to add a new printer.
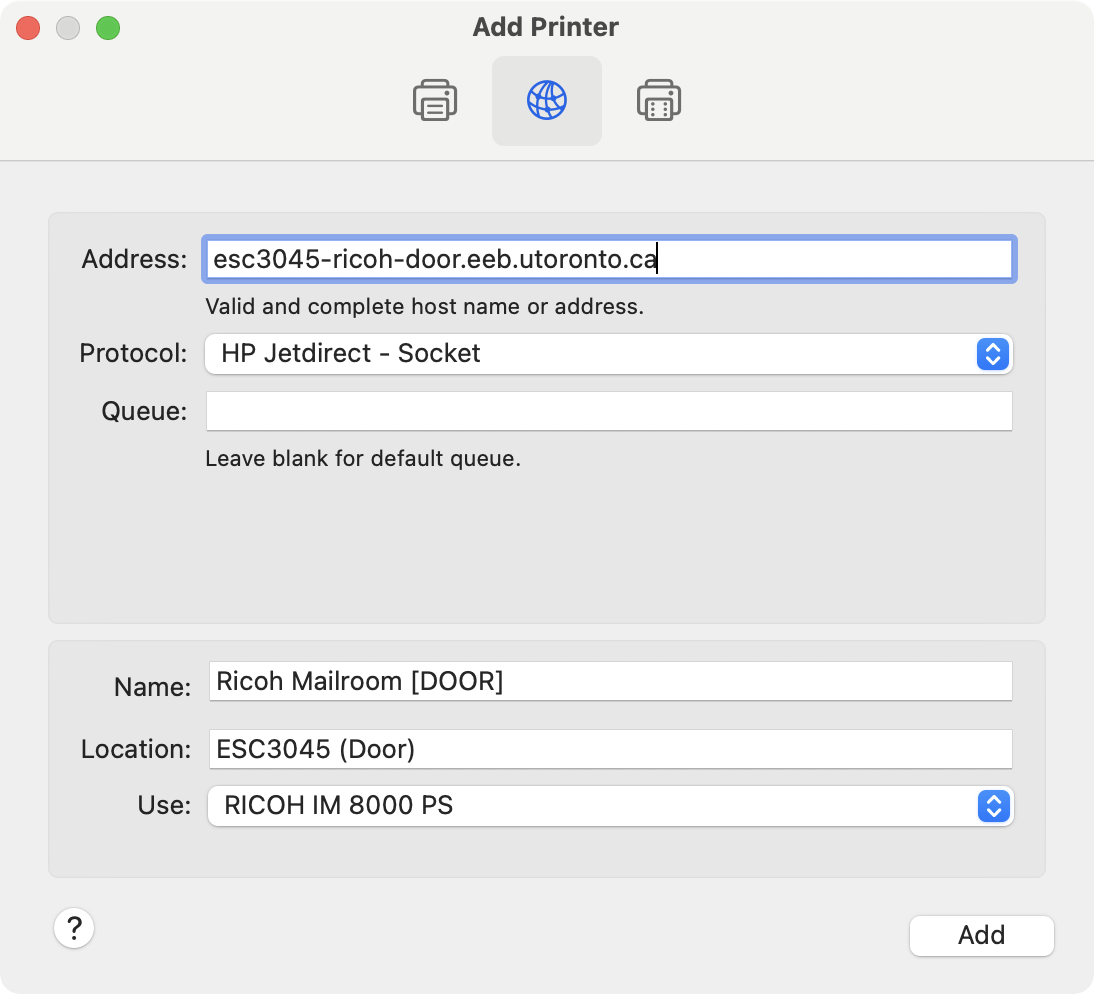
Click IP 🌐, enter the Address of the printer you want to add (see above)
Select the Protocol HP Jetdirect – Socket.
Type a Name for the printer (optional).
The correct printer driver should be auto-selected correctly in the last field. If you see Generic Printer, click the Use dropdown and click Auto Select to refresh. If you continue to see Generic Printer, go back and ensure the correct driver is installed for the printer you wish to use.
Before you can print anything, you need to enter the User Code you were given by the department.
Open any document and select Print. Click Show Details to reveal the full list of options. On the second half of the page find the dropdown menu indicated and select the Job Log page.
Click Enable User Code ( Not User ID ) and type your assigned code in the User Code box. Click Print to send your job to the printer.
So that you do not have to repeat this step each time you print, it is recommended you save your settings under Presets. Each time you print, ensure the saved Preset is selected that contains your User Code. If you have multiple User Codes (for specific courses, for example), you can save different codes under different presets and select the one appropriate for your document.

If your print dialog box does not look like the example above, there is an intermediate step required. Depending on the application, you may first need to click More Settings, then Print using the system dialog… This is necessary for popular programs like Adobe Acrobat, Google Chrome, Mozilla Thunderbird, and others.